
Over the years, I’ve fallen victim to early adopter challenges. I built my first DVR enabled PC in 2001. I’ve continued to snub the traditional consumer market, preferring instead to go it alone, and have more control. I have a lot of television recordings collected in numerous formats. So large, that the ability to reduce my storage needs is important. In fact, I started to delete recordings simply to save space. Early on, because most recordings were in standard definition (SD), I eventually chose to burn video’s to DVD to save space. Overtime, storing and organizing the library of DVD’s became cumbersome too.
I really didn’t like the fact that my recordings included “wasted” space storing commercials as well as the program. So I tried some applications that were designed to automatically detect commercials and cut them out. Early on, the results weren’t very good at all. So I started working on a process that I could use to cut out commercials and keep only the portions of the video that I wanted. This is really handy in reducing the size of football games for example…
What I wanted:
- A simple method to mark the start and end of clips fast and easily.
- Control over quality and container formats.
- Fast performance.
- The ability to edit without having to re-encode video.
- The ability to retain captions.
Naturally, as a user of Windows Media Center, I use MCE Buddy to convert my recordings, and I encourage geek users to try it if they haven’t. It’s an incredibly powerful solution for many challenges. In particular, it’s very good at integrating the best of many of the open source contributions. It does include commercial cutting options as well, but I’ve never had great success with them, and really want to have archival quality edits.
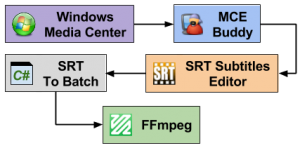
Long story short, I came up with a process that looks like figure 1. I schedule recordings using Windows Media Center, and MCE Buddy performs several tasks, including demuxing the audio, video, and subtitles. The Audio and Video streams are saved as MP4 files, and a separate SubRip file with the subtitles.
Once I have the SRT and MP4 files, I use SRT Subtitles Editor to add start and end points using a special syntax {START} and {CUT}. I then feed that subrip file into a custom application that looks at the time stamp of the start and cut points. This application then converts that information into a series command line inputs, as seen below.
|
1 |
ffmpeg -ss 00:02:45.952 -i {filename}.mp4 -ss 00:00:02.000 -t 00:06:15.691 -c:v copy -c:a copy -sn {filename}-Part-0.mp4 -n |
Each portion of the show results in a command line similar to the above with different start and end points. The command basically seeks to a specific point, copy’s the audio and video into a new temporary file, each one numbered sequentially. Then each of those file names are written to a text document listing each file:
|
1 2 |
file 'C:\VideoTemp\{filename}-Part-0.mp4' file 'C:\VideoTemp\{filename}-Part-1.mp4' |
Finally, a batch file is created to stitch all the segments back together, creating the archive quality format that I was looking for.
|
1 |
ffmpeg -f concat -i "{filelist}.txt" -i "{filename}.srt" -c copy -scodec copy -metadata:s:a:0 language=eng -metadata:s:s:0 language=eng "C:\Archive\{filename}.mkv" |
I was pleased with the results of the process as a starting point. In future writing, I may outline how I modified the application, or even share some code snippets, but the current iteration of the application allows me to add fade effects to the audio and video streams.
Applications: